07 Maret 2018

Repair panic: ufs_dirbad: /: bad dir ino FreeBSD

Komputer random reboot dengan error di console spt ini.
...
panic: ufs_dirbad: /: bad dir ino 1777399 at offset 3072: mangled entry
...
Perbaiki dengan cara sebagai berikut:

Booting single user (read-only mode tanpa mounting file-system).

Lakukan fsck -y terlebih dahulu.

Check partisi yang bermasalah, dalam hal ini partisi root (/).
# cat /etc/fstab
# Device        Mountpoint      FStype  Options Dump    Pass#
/dev/ada0p2     /               ufs     rw      1       1
/dev/ada0p3     none            swap    sw      0       0
fdesc           /dev/fd         fdescfs rw      0       0
Lakukan pengecekan di /dev/ada0p2 yg mana adalah partisi root (/).
# fsdb /dev/ada0p2
Cari inode yang ditunjukan sesuai error diatas, dalam hal ini inode 1777399. Dalam hal fsdb akan menunjukan file atribut mana saja yang bermasalah.
fsdb (inum: 2)> inode 1777399
Skg kita ada di prompt inum 1777399, lakukan clear untuk inode 1777399.
fsdb (inum: 1777399)> clri 1777399
Exit debugger fsdb.
fsdb (inum: 1777399)> quit
Lakukan fsck -y kembali, mungkin akan diperlukan beberapa kali sampai file-system benar-benar clean.
# fsck -y /dev/ada0p2

17 Oktober 2017

Resize Partition di FreeBSD

Kita cek partisi yang ada di OS kita.
root:~# gpart show ada0
=>       34  312581741  ada0  GPT  (149G)
         34        128     1  freebsd-boot  (64K)
        162  304086912     2  freebsd-ufs  (145G)
  304087074    8388608     3  freebsd-swap  (4.0G)
  312475682     106093        - free -  (52M)
Kita akan menghapus free-space dan meresize ada0p2/ada0p3. deaktifkan dahulu swap-nya.
root:~# swapoff /dev/ada0p3
Matikan dahulu GEOM Safety variable lewat sysctl(8).
root:~# sysctl kern.geom.debugflags=16
Hapus partisi freebsd-swap (/dev/ada0p3) dahulu. Partisi ini hanya penyimpanan sementara saja, jd aman untuk dihapus.
root:~# gpart delete -i 3 ada0
Sekarang kita lakukan resize untuk partisi freebsd-ufs (/dev/ada0p2) dari 145G ke 147G. Untuk swap dikurangi 2G.
root:~# gpart resize -i 2 -a 4k -s 147G ada0
Bikin kembali swap-nya & aktifkan kembali partisinya.
root:~# gpart add -t freebsd-swap ada0
root:~# swapon /dev/ada0p3
Cek ulang partisi akhirnya & aktifkan kembali GEOM Safety variable.
root:~# gpart show ada0
=>       34  312581741  ada0  GPT  (149G)
         34        128     1  freebsd-boot  (64K)
        162  308281342     2  freebsd-ufs  (147G)
  308281504    4300271     3  freebsd-swap  (2.0G)

root:~# sysctl kern.geom.debugflags=0
kern.geom.debugflags: 16 -> 0
Agar size baru (/dev/ada0p2 - freebsd-ufs) dapat digunakan sesuai dengan size yang baru dibikin.
root:~# growfs /dev/ada0p2
Device is mounted read-write; resizing will result in temporary write suspension for /.
It's strongly recommended to make a backup before growing the file system.
OK to grow filesystem on /dev/ada0p2, mounted on /, from 145GB to 147GB? [Yes/No] yes
super-block backups (for fsck_ffs -b #) at:
 305234240, 306516736, 307799232

11 Oktober 2017

Recovery Bad-Sector Hardisk di FreeBSD

Terlebih dahulu backup data penting!
Cek bad sector hardisk.
root:~# smartctl -t long /dev/ada0
root:~# smartctl -l selftest /dev/ada0 | awk 'NR==7'
# 1  Extended offline    Completed: read failure       90%     36067         27292160
                                                                             ^^^^^^^^ (L)
Cek UFS file system.
root:~# dumpfs /dev/ada0p2 | egrep '^bsize'
bsize   32768   shift   15      mask    0xffff8000
        ^^^^^ (B)
Cari sector pertama partisi yg digunakan dalam hardisk.
root:~# fdisk -s /dev/ada0
/dev/ada0: 310101 cyl 16 hd 63 sec
Part        Start        Size Type Flags
   1:           1   312581807 0xee 0x00
                ^ (S)
Cari sector-size hardisk.
root:~# gpart list ada0 | tail -n 5
1. Name: ada0
   Mediasize: 160041885696 (149G)
   Sectorsize: 512
               ^^^ (M) 
   Mode: r2w2e3
Gunakan formula dibawah ini.
b = ((L - S) * M) / B)
L = 27292160
S = 1
M = 512
B = 32768

b = ((27292160 - 1) * 512) / 32768
b = 426439.984375 ~ 426439 (int)
Rubah permission agar bisa mode write.
root:~# sysctl kern.geom.debugflags=0x10
Untuk sector 426439 (bad sector) tidak akan digunakan oleh sistem untuk menyimpan data.
root:~# dd if=/dev/zero of=/dev/ada0 bs=32768 count=1 seek=426439
Untuk diagnosa isi sector 426439 (bad sector) bisa diredirect outputnya ke file.
root:~# dd if=/dev/ada0 of=hasil.txt bs=32768 count=1 skip=426439
Kembalikan permission ke semula.
root:~# sysctl kern.geom.debugflags=0
Cek kembali bad sector.
root:~# smartctl -t long /dev/ada0
Pastikan hasilnya -. Ini sample outputnya:
root:~# smartctl -l selftest /dev/ada0 | awk 'NR==7'
# 1  Extended offline    Completed without error       00%     36073         -
                                                                             ^
Jangan lupa setelah yakin tidak ada bad sector, recovery semua file lewat make world & restore file backup.

15 Juli 2017

FreeBSD: make buildworld failure in libllvmsupport

Saya mendapat error yg cukup mengesalkan ketika Rebuild FreeBSD dari source , cukup lama googling mencari referensi error yang terjadi, ternyata solusinya cukup simple meskipun dengan nebak2 library clang(1) yg digunakan. Seperti kita ketahui bahwa FreeBSD 10.0-RELEASE sudah merubah untuk default compilernya dari GCC ke clang(1). Berikut saya post error yang terjadi:
c++  -O2 -pipe -I/usr/src/lib/clang/libllvmsupport/../../../contrib/llvm/include -I/usr/src/lib/clang/libllvmsupport/../../../contrib/llvm/tools/clang/include -I/usr/src/lib/clang/libllvmsupport/../../../contrib/llvm/lib/Support -I. -I/usr/src/lib/clang/libllvmsupport/../../../contrib/llvm/../../lib/clang/include -DLLVM_ON_UNIX -DLLVM_ON_FREEBSD -D__STDC_LIMIT_MACROS -D__STDC_CONSTANT_MACROS -DNDEBUG -fno-strict-aliasing -DLLVM_DEFAULT_TARGET_TRIPLE=\"i386-unknown-freebsd10.3\" -DLLVM_HOST_TRIPLE=\"i386-unknown-freebsd10.3\" -DDEFAULT_SYSROOT=\"\" -ffunction-sections -fdata-sections -I/usr/obj/usr/src/tmp/legacy/usr/include  -fno-exceptions -fno-rtti  -c /usr/src/lib/clang/libllvmsupport/../../../contrib/llvm/lib/Support/APFloat.cpp -o APFloat.o
In file included from /usr/src/lib/clang/libllvmsupport/../../../contrib/llvm/lib/Support/APFloat.cpp:15:
In file included from /usr/src/lib/clang/libllvmsupport/../../../contrib/llvm/include/llvm/ADT/APFloat.h:20:
In file included from /usr/src/lib/clang/libllvmsupport/../../../contrib/llvm/include/llvm/ADT/APInt.h:19:
In file included from /usr/src/lib/clang/libllvmsupport/../../../contrib/llvm/include/llvm/ADT/ArrayRef.h:14:
In file included from /usr/src/lib/clang/libllvmsupport/../../../contrib/llvm/include/llvm/ADT/SmallVector.h:17:
In file included from /usr/src/lib/clang/libllvmsupport/../../../contrib/llvm/include/llvm/Support/AlignOf.h:19:
In file included from /usr/include/c++/v1/cstddef:38:
In file included from /usr/include/c++/v1/stddef.h:51:
/usr/include/c++/v1/__nullptr:24:29: error: variable has incomplete type 'struct _LIBCPP_TEMPLATE_VIS'
struct _LIBCPP_TEMPLATE_VIS nullptr_t
                            ^
/usr/include/c++/v1/__nullptr:24:8: note: forward declaration of 'std::__1::_LIBCPP_TEMPLATE_VIS'
struct _LIBCPP_TEMPLATE_VIS nullptr_t
       ^
/usr/include/c++/v1/__nullptr:24:38: error: expected ';' after top level declarator
struct _LIBCPP_TEMPLATE_VIS nullptr_t
                                     ^
/usr/include/c++/v1/__nullptr:47:48: error: unknown type name 'nullptr_t'
inline _LIBCPP_ALWAYS_INLINE _LIBCPP_CONSTEXPR nullptr_t __get_nullptr_t() {return nullptr_t(0);}
                                               ^
In file included from /usr/src/lib/clang/libllvmsupport/../../../contrib/llvm/lib/Support/APFloat.cpp:15:
In file included from /usr/src/lib/clang/libllvmsupport/../../../contrib/llvm/include/llvm/ADT/APFloat.h:20:
In file included from /usr/src/lib/clang/libllvmsupport/../../../contrib/llvm/include/llvm/ADT/APInt.h:19:
In file included from /usr/src/lib/clang/libllvmsupport/../../../contrib/llvm/include/llvm/ADT/ArrayRef.h:14:
In file included from /usr/src/lib/clang/libllvmsupport/../../../contrib/llvm/include/llvm/ADT/SmallVector.h:19:
In file included from /usr/src/lib/clang/libllvmsupport/../../../contrib/llvm/include/llvm/Support/MathExtras.h:18:
In file included from /usr/src/lib/clang/libllvmsupport/../../../contrib/llvm/include/llvm/Support/SwapByteOrder.h:18:
In file included from /usr/src/lib/clang/libllvmsupport/../../../contrib/llvm/../../lib/clang/include/llvm/Support/DataTypes.h:36:
In file included from /usr/include/c++/v1/cmath:301:
In file included from /usr/include/c++/v1/math.h:309:
/usr/include/c++/v1/type_traits:472:114: error: expected class name
    : public integral_constant(nullptr)) == 1> {};
                                                                                                                 ^
In file included from /usr/src/lib/clang/libllvmsupport/../../../contrib/llvm/lib/Support/APFloat.cpp:15:
In file included from /usr/src/lib/clang/libllvmsupport/../../../contrib/llvm/include/llvm/ADT/APFloat.h:20:
In file included from /usr/src/lib/clang/libllvmsupport/../../../contrib/llvm/include/llvm/ADT/APInt.h:19:
In file included from /usr/src/lib/clang/libllvmsupport/../../../contrib/llvm/include/llvm/ADT/ArrayRef.h:14:
In file included from /usr/src/lib/clang/libllvmsupport/../../../contrib/llvm/include/llvm/ADT/SmallVector.h:19:
In file included from /usr/src/lib/clang/libllvmsupport/../../../contrib/llvm/include/llvm/Support/MathExtras.h:18:
In file included from /usr/src/lib/clang/libllvmsupport/../../../contrib/llvm/include/llvm/Support/SwapByteOrder.h:18:
In file included from /usr/src/lib/clang/libllvmsupport/../../../contrib/llvm/../../lib/clang/include/llvm/Support/DataTypes.h:36:
/usr/include/c++/v1/cmath:679:46: error: declaration conflicts with target of using declaration already in scope
inline _LIBCPP_INLINE_VISIBILITY float       acos(float __lcpp_x) _NOEXCEPT       {return acosf(__lcpp_x);}
                                             ^
/usr/include/c++/v1/math.h:654:46: note: target of using declaration
inline _LIBCPP_INLINE_VISIBILITY float       acos(float __lcpp_x) _NOEXCEPT       {return acosf(__lcpp_x);}
                                             ^
/usr/include/c++/v1/cmath:675:9: note: using declaration
using ::acos;
        ^
/usr/include/c++/v1/cmath:680:46: error: declaration conflicts with target of using declaration already in scope
inline _LIBCPP_INLINE_VISIBILITY long double acos(long double __lcpp_x) _NOEXCEPT {return acosl(__lcpp_x);}
                                             ^
/usr/include/c++/v1/math.h:655:46: note: target of using declaration
inline _LIBCPP_INLINE_VISIBILITY long double acos(long double __lcpp_x) _NOEXCEPT {return acosl(__lcpp_x);}
                                             ^
/usr/include/c++/v1/cmath:675:9: note: using declaration
using ::acos;
        ^
/usr/include/c++/v1/cmath:686:1: error: declaration conflicts with target of using declaration already in scope
acos(_A1 __lcpp_x) _NOEXCEPT {return acos((double)__lcpp_x);}
^
/usr/include/c++/v1/math.h:661:1: note: target of using declaration
acos(_A1 __lcpp_x) _NOEXCEPT {return acos((double)__lcpp_x);}
^
/usr/include/c++/v1/cmath:675:9: note: using declaration
using ::acos;
        ^
/usr/include/c++/v1/cmath:694:46: error: declaration conflicts with target of using declaration already in scope
inline _LIBCPP_INLINE_VISIBILITY float       asin(float __lcpp_x) _NOEXCEPT       {return asinf(__lcpp_x);}
                                             ^
/usr/include/c++/v1/math.h:666:46: note: target of using declaration
inline _LIBCPP_INLINE_VISIBILITY float       asin(float __lcpp_x) _NOEXCEPT       {return asinf(__lcpp_x);}
                                             ^
/usr/include/c++/v1/cmath:690:9: note: using declaration
using ::asin;
        ^
/usr/include/c++/v1/cmath:695:46: error: declaration conflicts with target of using declaration already in scope
inline _LIBCPP_INLINE_VISIBILITY long double asin(long double __lcpp_x) _NOEXCEPT {return asinl(__lcpp_x);}
                                             ^
/usr/include/c++/v1/math.h:667:46: note: target of using declaration
inline _LIBCPP_INLINE_VISIBILITY long double asin(long double __lcpp_x) _NOEXCEPT {return asinl(__lcpp_x);}
                                             ^
/usr/include/c++/v1/cmath:690:9: note: using declaration
using ::asin;
        ^
/usr/include/c++/v1/cmath:701:1: error: declaration conflicts with target of using declaration already in scope
asin(_A1 __lcpp_x) _NOEXCEPT {return asin((double)__lcpp_x);}
^
/usr/include/c++/v1/math.h:673:1: note: target of using declaration
asin(_A1 __lcpp_x) _NOEXCEPT {return asin((double)__lcpp_x);}
^
/usr/include/c++/v1/cmath:690:9: note: using declaration
using ::asin;
        ^
/usr/include/c++/v1/cmath:709:46: error: declaration conflicts with target of using declaration already in scope
inline _LIBCPP_INLINE_VISIBILITY float       atan(float __lcpp_x) _NOEXCEPT       {return atanf(__lcpp_x);}
                                             ^
/usr/include/c++/v1/math.h:678:46: note: target of using declaration
inline _LIBCPP_INLINE_VISIBILITY float       atan(float __lcpp_x) _NOEXCEPT       {return atanf(__lcpp_x);}
                                             ^
/usr/include/c++/v1/cmath:705:9: note: using declaration
using ::atan;
        ^
/usr/include/c++/v1/cmath:710:46: error: declaration conflicts with target of using declaration already in scope
inline _LIBCPP_INLINE_VISIBILITY long double atan(long double __lcpp_x) _NOEXCEPT {return atanl(__lcpp_x);}
                                             ^
/usr/include/c++/v1/math.h:679:46: note: target of using declaration
inline _LIBCPP_INLINE_VISIBILITY long double atan(long double __lcpp_x) _NOEXCEPT {return atanl(__lcpp_x);}
                                             ^
/usr/include/c++/v1/cmath:705:9: note: using declaration
using ::atan;
        ^
/usr/include/c++/v1/cmath:716:1: error: declaration conflicts with target of using declaration already in scope
atan(_A1 __lcpp_x) _NOEXCEPT {return atan((double)__lcpp_x);}
^
/usr/include/c++/v1/math.h:685:1: note: target of using declaration
atan(_A1 __lcpp_x) _NOEXCEPT {return atan((double)__lcpp_x);}
^
/usr/include/c++/v1/cmath:705:9: note: using declaration
using ::atan;
        ^
/usr/include/c++/v1/cmath:724:46: error: declaration conflicts with target of using declaration already in scope
inline _LIBCPP_INLINE_VISIBILITY float       atan2(float __lcpp_y, float __lcpp_x) _NOEXCEPT             {return atan2f(__lcpp_y, __lcpp_x);}
                                             ^
/usr/include/c++/v1/math.h:690:46: note: target of using declaration
inline _LIBCPP_INLINE_VISIBILITY float       atan2(float __lcpp_y, float __lcpp_x) _NOEXCEPT             {return atan2f(__lcpp_y, __lcpp_x);}
                                             ^
/usr/include/c++/v1/cmath:720:9: note: using declaration
using ::atan2;
        ^
/usr/include/c++/v1/cmath:725:46: error: declaration conflicts with target of using declaration already in scope
inline _LIBCPP_INLINE_VISIBILITY long double atan2(long double __lcpp_y, long double __lcpp_x) _NOEXCEPT {return atan2l(__lcpp_y, __lcpp_x);}
                                             ^
/usr/include/c++/v1/math.h:691:46: note: target of using declaration
inline _LIBCPP_INLINE_VISIBILITY long double atan2(long double __lcpp_y, long double __lcpp_x) _NOEXCEPT {return atan2l(__lcpp_y, __lcpp_x);}
                                             ^
/usr/include/c++/v1/cmath:720:9: note: using declaration
using ::atan2;
        ^
/usr/include/c++/v1/cmath:736:1: error: declaration conflicts with target of using declaration already in scope
atan2(_A1 __lcpp_y, _A2 __lcpp_x) _NOEXCEPT
^
/usr/include/c++/v1/math.h:702:1: note: target of using declaration
atan2(_A1 __lcpp_y, _A2 __lcpp_x) _NOEXCEPT
^
/usr/include/c++/v1/cmath:720:9: note: using declaration
using ::atan2;
        ^
/usr/include/c++/v1/cmath:750:46: error: declaration conflicts with target of using declaration already in scope
inline _LIBCPP_INLINE_VISIBILITY float       ceil(float __lcpp_x) _NOEXCEPT       {return ceilf(__lcpp_x);}
                                             ^
/usr/include/c++/v1/math.h:713:46: note: target of using declaration
inline _LIBCPP_INLINE_VISIBILITY float       ceil(float __lcpp_x) _NOEXCEPT       {return ceilf(__lcpp_x);}
                                             ^
/usr/include/c++/v1/cmath:746:9: note: using declaration
using ::ceil;
        ^
/usr/include/c++/v1/cmath:751:46: error: declaration conflicts with target of using declaration already in scope
inline _LIBCPP_INLINE_VISIBILITY long double ceil(long double __lcpp_x) _NOEXCEPT {return ceill(__lcpp_x);}
                                             ^
/usr/include/c++/v1/math.h:714:46: note: target of using declaration
inline _LIBCPP_INLINE_VISIBILITY long double ceil(long double __lcpp_x) _NOEXCEPT {return ceill(__lcpp_x);}
                                             ^
/usr/include/c++/v1/cmath:746:9: note: using declaration
using ::ceil;
        ^
/usr/include/c++/v1/cmath:757:1: error: declaration conflicts with target of using declaration already in scope
ceil(_A1 __lcpp_x) _NOEXCEPT {return ceil((double)__lcpp_x);}
^
/usr/include/c++/v1/math.h:720:1: note: target of using declaration
ceil(_A1 __lcpp_x) _NOEXCEPT {return ceil((double)__lcpp_x);}
^
/usr/include/c++/v1/cmath:746:9: note: using declaration
using ::ceil;
        ^
fatal error: too many errors emitted, stopping now [-ferror-limit=]
20 errors generated.
*** Error code 1

Stop.
make[3]: stopped in /usr/src/lib/clang/libllvmsupport
*** Error code 1

Stop.
make[2]: stopped in /usr/src
*** Error code 1

Stop.
make[1]: stopped in /usr/src
*** Error code 1

Stop.
make: stopped in /usr/src
Solusi yang saya lakukan adalah sbb:
Keyword ada di /usr/include/c++/v1/cmath:746, error itu kurang lebih seputar header declaration konflik dengan header yang sudah terinstall sebelomnya. Tipe data long double sepertinya tidak dapat didefinisikan di scope ketika proses build object file. Temukan file cmath di /usr dengan perintah:
root:/usr# find . -type f -name "cmath"
./src/contrib/libstdc++/include/tr1/cmath
./src/contrib/libc++/include/cmath (cmath dari source SVN)
./include/c++/v1/cmath (cmath yang bermasalah)
./local/lib/gcc5/include/c++/ext/cmath
./local/lib/gcc5/include/c++/tr1/cmath
./local/lib/gcc5/include/c++/cmath
OK, kita liat susunan direktori & filenya banyak kemiripan antara /usr/include/c++/v1/ dengan /usr/src/contrib/libc++/include/. Kita tinggal copykan saja tapi sebelomnya kita backup terlebih dahulu.
root:~# cd /usr/include/c++
root:/usr/include/c++# mv v1 v1.old
root:/usr/include/c++# cp -rp /usr/src/contrib/libc++/include .
root:/usr/include/c++# mv include v1
Silahkan dicoba kembali proses make buildworld, saya mengalami kekurangan dua file header yg dibutuhkan yaitu cxxabi.h dan unwind.h, silahkan kita cari lagi kedua file ini di /usr/src dan kopikan saja:
root:/usr/include/c++/v1# find /usr/src -type f -name "cxxabi.h"
/usr/src/contrib/libstdc++/libsupc++/cxxabi.h
/usr/src/contrib/libcxxrt/cxxabi.h (Kita ambil yang ini)
root:/usr/include/c++/v1# cp /usr/src/contrib/libcxxrt/cxxabi.h .
root:/usr/include/c++/v1# find /usr/src -type f -name "unwind.h"
/usr/src/sys/ia64/include/unwind.h
/usr/src/contrib/libcxxrt/unwind.h
/usr/src/contrib/llvm/tools/clang/lib/Headers/unwind.h (Kita ambil yang ini)
/usr/src/contrib/libexecinfo/unwind.h
/usr/src/include/unwind.h
root:/usr/include/c++/v1# cp /usr/src/contrib/llvm/tools/clang/lib/Headers/unwind.h .
Silahkan make buildworld kembali, jika ada error coba teliti stderr di consolenya. Dan silahkan tebak2 lagi seperti contoh langkah diatas :-).

15 Mei 2017

Instalasi SSL Gratis Dari Let's Encrypt

Beberapa waktu lalu saya sempat membahasa tentang pemasangan fitur SSL dengan metode Self-Signing. Sekarang, saya coba menggunakan Let's Encrypt. Caranya cukup sederhana karena semua dikerjakan secara auto.
• Download atau copy-paste acme.sh di https://github.com/Neilpang/acme.sh.
• Copykan di root folder, usahakan menggunakan root akses karena kita perlu merestart daemon nginx webserver dan menempatkan sertifikat di /etc/ssl/certs. Buat folder .acme.sh di root folder dan download acme.sh script.
# mkdir .acme.sh
# cd .acme.sh && fetch https://raw.githubusercontent.com/Neilpang/acme.sh/master/acme.sh
# chmod 700 acme.sh
Kita mulai mengkonfigurasi dan menginstal sertifikatnya. Saya asumsikan anda sudah mempunyai sebuah domain yang valid dan terinstall webserver.
# cd .acme.sh
# ./acme.sh --issue -d domainanda.com -w /path/to/root/webserver/document
[Mon May 15 19:28:12 WIB 2017] Registering account
[Mon May 15 19:28:15 WIB 2017] Registered
[Mon May 15 19:28:16 WIB 2017] Update success.
[Mon May 15 19:28:16 WIB 2017] ACCOUNT_THUMBPRINT='MINkdh3CiCitr1h4YesQSO2azn7bs3NIFwJOLbTSpug'
[Mon May 15 19:28:16 WIB 2017] Creating domain key
[Mon May 15 19:28:17 WIB 2017] Single domain='domainanda.com'
[Mon May 15 19:28:17 WIB 2017] Getting domain auth token for each domain
[Mon May 15 19:28:17 WIB 2017] Getting webroot for domain='domainanda.com'
[Mon May 15 19:28:17 WIB 2017] Getting new-authz for domain='domainanda.com'
[Mon May 15 19:28:19 WIB 2017] The new-authz request is ok.
[Mon May 15 19:28:19 WIB 2017] Verifying:domainanda.com
[Mon May 15 19:28:24 WIB 2017] Success
[Mon May 15 19:28:24 WIB 2017] Verify finished, start to sign.
[Mon May 15 19:28:26 WIB 2017] Cert success.
-----BEGIN CERTIFICATE-----
MIIE/DCCA+SgAwIBAgISBAb5KVD8Z+F2hCdzvVfK0cp6MA0GCSqGSIb3DQEBCwUA
MEoxCzAJBgNVBAYTAlVTMRYwFAYDVQQKEw1MZXQncyBFbmNyeXB0MSMwIQYDVQQD
ExpMZXQncyBFbmNyeXB0IEF1dGhvcml0eSBYMzAeFw0xNzA1MTUxMTI4MDBaFw0x
NzA4MTMxMTI4MDBaMBcxFTATBgNVBAMTDHduLnNseWlwLm5ldDCCASIwDQYJKoZI
hvcNAQEBBQADggEPADCCAQoCggEBALtbiMysoSdf+7VfuiL+6vc5qscn6DPd2j2f
YbWVIki3PdsJUmr66/oj3wRXRMbzflhfVgLfnFvj9mUb+44pIChRSc5R4AboqIFo
vngilTgDAjtbpceCmeTj3DNpa1sJN9BVmrfRazLBgzg0dPQ6QJpixtKcRiwbOJsx
k5XM7SOeq1hFpNef3NPc6wyIhcv+h+e1Id8WJPWGaJgNq+QnC7AnnIRRcjuaCZsl
SKeenGBUcpHKNUKOY7AADZ2hHR74Eg7IGcbOt+LrnljE/613BXi2U8GYbL28LoIq
YrNFAxjqoKPXZtfWuIHYYxfAbiejGhnmzPPKlKsZ2rRTAREZJUMCAwEAAaOCAg0w
ggIJMA4GA1UdDwEB/wQEAwIFoDAdBgNVHSUEFjAUBggrBgEFBQcDAQYIKwYBBQUH
AwIwDAYDVR0TAQH/BAIwADAdBgNVHQ4EFgQUbBO4xZOZeedw10ZZYg083IAcnqgw
HwYDVR0jBBgwFoAUqEpqYwR93brm0Tm3pkVl7/Oo7KEwcAYIKwYBBQUHAQEEZDBi
MC8GCCsGAQUFBzABhiNodHRwOi8vb2NzcC5pbnQteDMubGV0c2VuY3J5cHQub3Jn
LzAvBggrBgEFBQcwAoYjaHR0cDovL2NlcnQuaW50LXgzLmxldHNlbmNyeXB0Lm9y
Zy8wFwYDVR0RBBAwDoIMd24uc2x5aXAubmV0MIH+BgNVHSAEgfYwgfMwCAYGZ4EM
AQIBMIHmBgsrBgEEAYLfEwEBATCB1jAmBggrBgEFBQcCARYaaHR0cDovL2Nwcy5s
ZXRzZW5jcnlwdC5vcmcwgasGCCsGAQUFBwICMIGeDIGbVGhpcyBDZXJ0aWZpY2F0
ZSBtYXkgb25seSBiZSByZWxpZWQgdXBvbiBieSBSZWx5aW5nIFBhcnRpZXMgYW5k
IG9ubHkgaW4gYWNjb3JkYW5jZSB3aXRoIHRoZSBDZXJ0aWZpY2F0ZSBQb2xpY3kg
Zm91bmQgYXQgaHR0cHM6Ly9sZXRzZW5jcnlwdC5vcmcvcmVwb3NpdG9yeS8wDQYJ
KoZIhvcNAQELBQADggEBAJad1Nm5x62oMmMNy2zsCe6bckLQaW5MhqXzez13Uz2A
DnaUTgpYC6+AIJmCaPjNkozSOcb8KDXPx2Mmdt16ZB0wjgBqcMJfcrm9EjTXafQZ
SlIXQYQuB0hsoJIXWQacAXjNlFnRUSEk9DSCBy7Xnq55qbFPrrqj3L51qjlGE6zE
s+Fbt0BIKpybBy0JGltMJtAQaVkFgYnAXj1mvKSnf3FYwBySNBciumyKDr9cSlkQ
CyjduyR7HB3GgeIlndYvPnkT0x5PEdWoiqh8ACMAWqJyfwEXWGOTxBNdtMdbGV37
zDyK/nDHeWd2LP3dXxCxaSxrhFHD0hnRv+krOzHguXU=
-----END CERTIFICATE-----
[Mon May 15 19:28:26 WIB 2017] Your cert is in  /root/.acme.sh/domainanda.com/domainanda.com.cer
[Mon May 15 19:28:26 WIB 2017] Your cert key is in  /root/.acme.sh/domainanda.com/domainanda.com.key
[Mon May 15 19:28:26 WIB 2017] The intermediate CA cert is in  /root/.acme.sh/domainanda.com/ca.cer
[Mon May 15 19:28:26 WIB 2017] And the full chain certs is there:  /root/.acme.sh/domainanda.com/fullchain.cer
# ls -laF
drwxr-xr-x   4 root  wheel     512 May 15 19:28:39 2017 .
drwxr-xr-x  12 root  wheel    1024 May 15 19:25:13 2017 ..
-rw-r--r--   1 root  wheel     196 May 15 19:28:26 2017 account.conf
-rwxr-xr-x   1 root  wheel  142712 May  3 21:04:02 2017 acme.sh
drwxr-xr-x   3 root  wheel     512 May 15 19:28:09 2017 ca
-rw-r--r--   1 root  wheel     448 May 15 19:28:26 2017 http.header
drwxr-xr-x   2 root  wheel     512 May 15 19:28:26 2017 domainanda.com
Selanjutkan kita lakukan proses instalasi sertifikatnya.
# cd .acme.sh && ./acme.sh --install-cert -d domainanda.com --key-file /etc/ssl/certs/domainanda.com.key --fullchain-file /etc/ssl/certs/domainanda.com.pem
# vim /usr/local/etc/nginx/nginx.conf
server {
    listen  domainanda.com:443 ssl default_server;
    root   /usr/local/www/data;
    add_header X-Powered-By "domainanda.com";
    add_header X-Frame-Options "SAMEORIGIN" always;
    add_header X-XSS-Protection "1; mode=block" always;
    add_header X-Content-Type-Options "nosniff" always;
    add_header Referrer-Policy no-referrer;
    add_header Strict-Transport-Security "max-age=31536000;" always;
    add_header Content-Security-Policy "default-src 'self'; script-src 'self' domainanda.com";
    ssl_certificate      /etc/ssl/certs/domainanda.com.pem;
    ssl_certificate_key  /etc/ssl/certs/domainanda.com.key;
    ssl_dhparam /etc/ssl/certs/dhparam.pem;
    ssl_ecdh_curve secp384r1;
    ssl_session_tickets off;
    ssl_session_cache    shared:SSL:1m;
    ssl_session_timeout  5m;
    ssl_prefer_server_ciphers  on;
    ssl_ciphers "EECDH+AESGCM:EDH+AESGCM:AES256+EECDH:AES256+EDH";
}
# /usr/local/etc/rc.d/nginx restart
Karena sertifikat ini berlaku maksimal cuma 3 bulan, maka kita harus merenew sebelom expired:
# cd /root/.acme.sh/ && ./acme.sh --renew -d domainanda.com --force
# cd /root/.acme.sh/ && ./acme.sh --install-cert -d domainanda.com --key-file /etc/ssl/certs/domainanda.com.key --fullchain-file /etc/ssl/certs/domainanda.com.pem
# /usr/local/etc/rc.d/nginx restart
Lakukan secara simultan dengan menggunakan crontab(5) setiap 2 bulan sekali:
# crontab -l
0       1       1       */2     *       cd /root/.acme.sh/ && ./acme.sh --renew -d domainanda.com --force && ./acme.sh --install-cert -d domainanda.com --key-file /etc/ssl/certs/domainanda.com.key --fullchain-file /etc/ssl/certs/domainanda.com.pem --reloadcmd "/usr/local/etc/rc.d/nginx reload"

25 Maret 2017

Menggunakan Email Client untuk POP3s/IMAPs Google's Mail

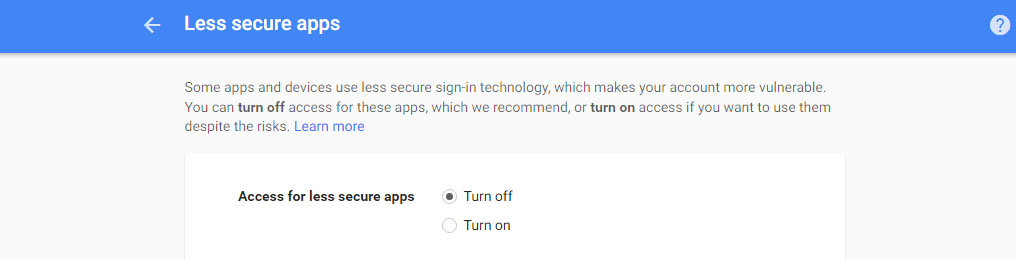
Beberapa waktu lalu untuk POP3s (POP3 support TLS/SSL) dan IMAPs (IMAP support TLS/SSL) bisa dengan mudah mengkonfigurasi Email client kita, namun akhir-akhir ini sudah tidak bisa dengan cara tersebut, karena Google sudah memberlakukan security dengan menggunakan OAuth 2.0. Dengan demikian Email client yang tidak mendukung mekanisme verifikasi OAuth 2.0 otomatis selalu mendapat error Wrong password, ada beberapa cara untuk mengakses Google's Mail dari desktop atau gadget kita.
• Menggunakan email client yang sudah mendukung OAuth atau,
• Setting account kita dengan mode Access for less secure apps menjadi Turn off lewat tautan ini.

Tentu cara yang kedua lebih fleksible meskipun dari sisi keamanan menjadikan akun kita rentan. Tapi bagaimana lagi karena kenyataannya belom banyak email client yang mendukung OAuth ini. Saya coba ThunderBird bisa bekerja tanpa setting Access for less secure ini tapi sayangnya hanya mendukung IMAPs (IMAP support TLS/SSL) saja.

20 Maret 2017

Links download program yang sering digunakan

05 Oktober 2016

Cara Rooting Di Xiaomi

Jika anda sudah berhasil mengikuti step-1 s/d step-4 di artikel Cara Flashing ROM Di Xiaomi, anda tinggal melakukan beberapa step saja untuk proses rooting di device Xiaomi ini. Untuk proses rooting umumnya ada beberapa cara yaitu dengan menggunakan custom recovery TWRP dan CyanogenMod. Dalam artikel ini saya menggunakan custom recovery dari TWRP.

Download terlebih dahulu custom recovery sesuai dengan device anda di https://twrp.me/Devices/. Jika device anda tidak ada di list itu, ya sudah bubar saja :-).

Saya menggunakan Xiaomi Mi 4i (ferrari) dan kebetulan ada di list devicenya. Silahkan download di https://dl.twrp.me/ferrari/twrp-3.0.2-0-ferrari.img simpan di komputer/laptop anda.

Download SU Binary disini dan simpan di storage device anda. SU Binary ini nanti dipake ketika device dalam mode Fastboot. Jadi pastikan jangan disimpan di komputer/laptop.

Pada artikel Cara Flashing ROM Di Xiaomi, anda sudah menginstall Xiaomi Mi Flash Tool Version 6.8.30 di komputer/laptop bukan? Nah kita perlu aplikasi yang namanya adb.exe dan fastboot.exe. Defaultnya ada di C:\Program Files\Xiaomi\MiPhone\Google\Android, biar gampang copykan saja twrp-3.0.2-0-ferrari.img yang sudah didownload tadi ke folder C:\Program Files\Xiaomi\MiPhone\Google\Android.

Buka Command Prompt, ketik perintah ini:
C:\Users\user>cd C:\Program Files\Xiaomi\MiPhone\Google\Android [Enter]
C:\Program Files\Xiaomi\MiPhone\Google\Android>adb devices [Enter]
* daemon not running. starting it now on port 5037 *
* daemon started successfully *
List of devices attached
8060faf1        device
Itu artinya device anda sudah dikenali. Silahkan masuk mode Fastboot spt yg sudah dijelaskan pada artikel Cara Flashing ROM Di Xiaomi step ke-10. Setelah itu kita lakukan proses rooting ini:
C:\Program Files\Xiaomi\MiPhone\Google\Android>fastboot flash recovery twrp-3.0.2-0-ferrari.img [Enter]
target reported max download size of 268435456 bytes
sending 'recovery' (27222 KB)...
OKAY [  0.860s]
writing 'recovery'...
OKAY [  0.895s]
finished. total time: 1.758s

Kita boot melalui dengan custom recovery baru:
C:\Program Files\Xiaomi\MiPhone\Google\Android>fastboot boot twrp-3.0.2-0-ferrari.img [Enter]
downloading 'boot.img'...
OKAY [  0.862s]
booting...
OKAY [  0.260s]
finished. total time: 1.125s

Nah, kita masuk ke mode TWRP, silahkan geserkan ke kanan Swipe to Unlock, lalu cari menu install dan arahkan ke file SuperSU-v2.78-201609011115.zip yang sudah kita simpan di device kita itu. Tinggal geser saja ke kanan Swipe to confirm Flash untuk mengkonfirmnya, tap Reboot System. Setelah itu device anda akan reboot otomatis dan sudah rooted.

17 September 2016

Cara Flashing ROM Di Xiaomi

Dalam artikel ini saya akan membagi pengalaman ketika Device Android Xiaomi Mi4i bootloop/bricked (Stuck di logo Xiaomi). Adapun langkahnya cukup sederhana saja dan saya akan coba rangkum cara flashing dengan metode Fastboot dengan singkat:
  1. Download USB Driver (ADB) untuk generic Android, USB Driver OEM (ADB) untuk Xiaomi, atau untuk Xiaomi Mi4i ada cara mudah yaitu install saja Mi PC Suite karena ini sudah include USB Drivernya.
  2. Lakukan setting untuk device anda agar masuk ke Developer options : Setting - About phone - MIUI version (Tab 3 kali, pastikan anda dapet notice: No need, you are already a developer). Selanjutnya: Setting - SYSTEM & DEVICE - Additional settings - Developer options (ON), USB debugging (ON).
  3. Unlock device Xiaomi Mi4i anda terlebih dahulu via http://en.miui.com/unlock/, ini semacam request ke vendor untuk meng-unlock device anda. Secara default device anda di-lock oleh vendor untuk keamanan. Request unlock ini sepenuhnya tanggung jawab anda. Ini kadang memakan waktu beberapa hari, jika sudah di-approve nanti bakal ada notifikasi via SMS/Email. Pastikan nomer HP-nya terpasang di device Xiaomi Mi4i dan anda sudah punya login Mi Account terverifikasi di device anda. 
  4. Jika sudah ada SMS/Email approved dari vendor, silahkan download dan install http://bigota.d.miui.com/miflashunlock/MiFlashUnlock_1.1.0317.1_en.zip, colokin device anda ke komputer/laptop dan ikuti langkah di layar komputer/laptop anda.
  5. Lakukan backup data, buka menu Windows Explore dan BACKUP semua data anda!. Setelah beres cabut kembali device Xiaomi anda.
  6. Pastikan komputer/laptop sudah terinstall Microsoft .NET Framework 3.5.
  7. Download dan install Xiaomi Mi Flash Tool Version 6.8.30.
  8. Download Xiaomi Mi 4i Latest Global Stable Version Fastboot. ROM Xiaomi umumnya dibagi dua bagian yaitu GLOBAL (English Version) dan CHINA (China Version) dan masing-masing dibagi dua lagi yaitu STABLE dan DEVELOPER. Jelas kita pilih yang GLOBAL (English Version) dan STABLE saja. Kalau versi DEVELOPER itu versi yang selalu Rapid Update dan untuk pengembang yang nge-develope aplikasi. Pastikan ROM sesuai dengan device yang anda miliki, dalam hal ini saya pake Xiaomi Mi4i. Silahkan sesuaikan dengan ROM kebutuhan anda di http://en.miui.com/a-234.html 
  9. Extract  Xiaomi Mi 4i Latest Global Stable Version Fastboot di komputer/laptop anda dan jalankan Xiaomi Mi Flash Tool Version 6.8.30 yang sudah diinstall tadi.
  10. Siapkan device Xiaomi anda masuk ke mode Fastboot dengan cara reboot, lalu pijit tombol volume down + tombol power secara simultan. Colokin device Xiaomi anda ke USB port di komputer/laptop, pastkan logo Fastboot sudah muncul di layar device anda dengan background warna hitam.
  11. Di menu Xiaomi Mi Flash Tool Version 6.8.30 pastikan device anda sudah detected, browse ke Xiaomi Mi 4i Latest Global Stable Version Fastboot yang sudah di-extract tadi. Di bagian bawah ada tiga pilihan mode-nya: Flash all, Flash all except Storage, Flash all except data and storage. Silahkan dipilih sesuai keperluan anda.
  12. Tunggu prosesnya sampai The operation completed successfully.... 
  13. Jika sudah beres, device anda akan reboot otomatis dan kembali seperti awal setup lagi.

05 Juni 2015

Transparent Proxy Squid SSL/HTTPS Support

Setelah mentok gara² certificate error akhirnya bisa sukses juga menggunakan transparent proxy untuk protocol HTTPS. Saya coba jelaskan secara garis besar dan singkat yah :-).

1. Update koleksi ports di FreeBSD untuk mendapatkan versi terbaru dan terupdate:
# portsnap fetch
# portsnap extract
# portsnap update
atau via SVN
# svn checkout svn://svn.freebsd.org/ports/head /usr/ports
2. Install squid seri versi 3.x yang sudah medukung SSLBump:
# cd /usr/ports/www/squid
# make menu
Pastikan opsi untuk SSL dan ssl_crtd support dicentang!
# make install clean
3. Konfigurasi post-install untuk direktori, permission etc:
# mkdir /usr/local/squid/ssl_db (Untuk penyimpanan cert-cache)
# chown -R squid:squid /usr/local/squid/ssl_db
# mkdir /usr/local/etc/squid/certs (Untuk penyimpanan cert self-signing)
# chown -R squid:squid /usr/local/etc/squid/certs
4. Pembuatan ceritificate self-signing yang akan digunakan oleh squid:
# cd /usr/local/etc/squid/certs
# openssl req -new -newkey rsa:1024 -days 1365 -nodes -x509 -keyout squid.pem -out squid.pem
# openssl x509 -in squid.pem -outform DER -out squid.der (DER Format)
# openssl x509 -in squid.pem -outform DER -out squid.crt (CRT Format)
5. Konfigurasi squid.conf:
# grep ssl /usr/local/etc/squid/squid.conf        
https_port yyy.yyy.yyy.yyy:xxxx transparent ssl-bump generate-host-certificates=on dynamic_cert_mem_cache_size=4MB cert=/usr/local/etc/squid/certs/squid.pem 
ssl_bump splice localhost        
ssl_bump server-first all        
ssl_bump bump all        
sslproxy_cert_error deny all        
sslproxy_flags DONT_VERIFY_PEER        
sslcrtd_program /usr/local/libexec/squid/ssl_crtd -s /usr/local/squid/ssl_db -M 4MB    
sslcrtd_children 32 startup=5 idle=1     

# /usr/local/libexec/squid/ssl_crtd -c -s /usr/local/etc/squid/certs/ssl_db  (Initialized SSLdb)     
# /usr/local/etc/rc.d/squid start
6. Redirect semua traffic port HTTP/HTTPS ke port squid:
# vim /etc/rc.firewall
${fwcmd} add 10 fwd ${ipproxy},${porthttpsproxy} tcp from ${ipclient} to any dst-port ${porthttps} in via ${ifint0}
ipproxy="ip_proxy_server"
porthttpsproxy="port_squid_for_https"   // See squid.conf.manual for detail
ipclient="ip_client"                    // For example: 192.168.0.0/24
porthttps="443"                         // HTTPS port default
ifint0="LAN_eth"                        // Ethernet connected to LAN directly
Atau jika menggunakan packet filter OpenBSD:
# vim /etc/pf.conf
rdr pass on $ifint0 proto tcp from $ipclient to any port 443 -> $ipproxy port $porthttpsproxy
7. Import sertifikat squid.der (Windows aja) atau squid.crt (untuk format Android/Windows):
C:\> certmgr.msc (Simpan di bagian CA certificate, klik2 aja deh sendiri...)
8. DONE!

22 April 2014

Self Signing SSL Certificate

Banyak bertebaran tentang tutorial ini di Google, Inc tapi saya ingin merangkumnya agak lebih efesien dan efektif. Awalnya saya menggunakan protocol HTTP untuk link download karena banyaknya app yg beredar bisa nge-sniff `clear URL
', maka saya harus bermigrasi ke protocol HTTPS yg pastinya di-encrypt, tapi untuk menggunakan protocol HTTPS ini sudah dipastikan harus ada verifikasi dari public SSL provider spt DigiCert, Verisign dsb, berupa sertifikat yg valid. Tapi berhubung saya cuma UKM so pasti keberatan kalo beli hehe...
Maka saya coba dengan metode Self-Sign Certificate meski tidak sesempurna sertifikat beli ya lumayan lah... OK, langkah awal pastikan webserver support dgn SSL, saya menggunakan Lighttpd + OpenSSL, saya tidak menjelaskan instalasinya yah...
root:~# lighttpd -v
lighttpd/1.4.35 (ssl) - a light and fast webserver
Build-Date: Apr 22 2014 13:54:26
root:~# cat /usr/local/etc/lighttpd/lighttpd.conf
1. Konfigurasi webserver agar support HTTPS.
$SERVER["socket"] == "xxx.xxx.xxx.xxx:443" {
        ssl.engine  = "enable"
        ssl.pemfile = "/etc/ssl/certs/server.pem"
        ssl.ca-file = "/etc/ssl/certs/server.crt"
        ssl.honor-cipher-order = "enable"
        ssl.use-sslv2 = "disable"
        ssl.use-sslv3 = "disable"
}
Redirect semua HTTP ke HTTPS
$HTTP["scheme"] == "http" {
        $HTTP["host"] =~ "domain.tld" {
            url.redirect = ( "/.*" => "https://%0$0" )
        }
}
2. Pembikinan sertifikat.
2.1 Pembikin sertifikat CA (Certificate Authority)
root:~# cd /etc/ssl
root:/etc/ssl# mkdir certs
root:/etc/ssl/certs# openssl genrsa -out ca.key 4096
root:/etc/ssl/certs# openssl req -x509 -new -sha256 -nodes -key ca.key -days 2555 -out ca.pem
root:/etc/ssl/certs# openssl x509 -outform der -in ca.pem -out ca.crt
2.2 Pembikinan sertifikat untuk server/site
root:/etc/ssl/certs# openssl genrsa -out server.key 4096
root:/etc/ssl/certs# openssl req -new -sha256 -key server.key -out server.csr
2.3 Pembikinan CRT dan PEM sertifikat
root:/etc/ssl/certs# cat v3.ext
authorityKeyIdentifier = keyid,issuer
basicConstraints = CA:FALSE
keyUsage = digitalSignature, nonRepudiation, keyEncipherment, dataEncipherment
root:/etc/ssl/certs# openssl x509 -req -sha256 -days 730 -extfile v3.ext -in server.csr -CA ca.pem -CAkey ca.key -CAcreateserial -out server.crt
root:/etc/ssl/certs# cat server.key server.crt > server.pem
root:/etc/ssl/certs# chmod 600 *
root:/etc/ssl/certs# /usr/local/etc/rc.d/lighttpd restart
Agar ter-verify silahkan dishare *.crt filenya, kalo client/browser kita sudah install *.crt pasti status Verified.

23 Maret 2014

Jengkol...oh...jengkol

Gak tau kenapa akhir-akhir ini kalo makan makanan yang berbahan dasar "Jengkol", kepala jadi pusing seperti masuk angin kira-kira. Padahal ini salah satu makanan favorit saya sejak kecil. Saya kepikiran apa gara-gara udah bertambah umur gitu[?]. Sewaktu kecil saya pernah makan sampe 10x dalam sehari kalo nemu jengkol ini, apapun cara masaknya. Biasanya disemur, dikecap atau di goreng plus pake sambal terasi mentah, lalab, asin, kerupuk dan kawan-kawan. Sampe-sampe keram perut dan dibawa kedokter (Over Dosis.red). Jujur saja sampe saat ini belom ada makanan yang ngalahin "candu" jengkol ini. Orang sunda bilang kalo makan ama jengkol "Olok Sangu! (Boros nasi)". 

13 Maret 2014

Setup DNSSEC-BIND di FreeBSD

Untuk menambah keamanan Bind sebagai resolver saya coba implementasikan DNSSEC di FreeBSD
1. Buat direktori untuk key & private file:
# mkdir /etc/namedb/key
# cd /etc/namedb/key
# dnssec-keygen -f KSK -a RSASHA1 -b2048 -n ZONE example.com
# dnssec-keygen -a RSASHA1 -b 768 -n ZONE example.com
2. Append isi dari kedua file *.key ke file db domain zone:
# cd /etc/namedb/
# cat key/Kexample.com.+005+*.key >> master/example.com.db 
3. Sign untuk db domain zone, sehingga terbetuk file example.com.db.signed di direktori master
# dnssec-signzone -o example.com -k Kexample.com.+005+15439.key ../master/example.com.db Kexample.com.+005+26382.key
4. Edit named.conf untuk menggunakan db domain yang telah di signed
zone "example.com" {
     type master;
     file "master/example.com.db.signed"
}
5. Untuk fingerprint bisa dicoba dengan command
# cd /etc/namedb/master/
# dnssec-dsfromkey -1 -f example.com.db.signed example.com example.com. IN DS 51367 5 1 527EE9DED3B1DC3F7FE9C7F3CE08E8E56674D6A8
6. Silahkan ditest outputnya kurang lebih seperti ini
# dig +dnssec +short example.com
A 5 2 3600 20140411175317 20140312175317 26382 example.com. hmBbAz1245O6tVLuXjnlKLqCH0JKguISPn3vTPI+ju8Kp8aBcgTI10tTQ7gtm5Xe7KJn60ggLnPIpnQN0GpVD5APbnOnsXi4QL0YKxJDp+yVcXbryG0svDaYaGtixhEp

26 Februari 2014

Menanti Kelahiran Dede "kecil"

Puji Tuhan, Diah Estiani istri saya telah hamil. Tuhan memang baik dan masih percaya untuk membesarkan titipanNya. Kalo istri hamil itu koq makin gede perutnya malah makin sexy yah... terlebih makin sayang banget... kadang juga saya suka kasian kl udah sakit pinggang, susah bergerak yah gimana lagi namanya juga lagi hamil (sabar yah sayang :-*). Yang penting suami harus siap jadi "suami siaga"....

Usia kandungan sekarang ampir 5 bulan dan kalo ngidam nih biasanya yang asem-asem dan pedes-pedes, tapi sayangnya istri saya punya maag, jd sering kambuh deh... ujungnya sering muntah-muntah. Susah emang salah satu sisi emang lagi ngidam tp sisi lain malah badannya gak kuat jenis makanan seperti itu.

Saya percaya semuanya pasti lancar selama kita berusaha dan tetep deket ama Tuhan, selalu doa untuk meminta apapun juga. Tuhan pasti sediakan semuanya kebutuhan kita, Amien

02 November 2013

Push Notifications iPhone

Beberapa bulan ini sering terjadi masalah dengan "push notifications iPhone", saya coba-coba mulai dari network system, karena di tempat saya semua di area DMZ lewat NAT, semua device terkoneksi lewat WiFi. Disamping itu, iPhone saya bawaan dari Aussie yg telah di Unlock (FU). Mungkin karena iPhonenya sering di otak-atik jadi banyak kemungkinan permasalahan notifikasi harus dilihat dari berbagai hal. Langkah yang saya tempuh adalah:
  1. Jika menggunakan WiFi pastikan encrypt methodnya mendukung device anda, saya menggunakan WEP 64 bit, gunakan channel yg tidak interferensi jika anda menggunakan beberapa AP (Access Point) sebagai repeater.
  2. Jika anda menggunakan router, pastikan TCP port 5223, TCP Port 443 sudah diallow. Untuk lebih detail silahkan check http://support.apple.com/kb/TS4264
  3. Yang sering menjadi kendalanya adalah di devicenya itu sendiri (iPhone), banyak permasalahan setelah upgrade iOS, atau resetting iPhone, push notifications jadi tidak jalan. Setelah saya coba-coba dari mulai resetting/restoring device, login/logout Apple ID, dsb semua tidak ada yang berhasil. Alhasil yang paling mujarab adalah dengan menggunakan metode "Deactivate RedSn0w", seperti kita ketahui RedSn0w salah satu tool Jailbreak iPhone.
Caranya "Deactivate RedSn0w" ini cukup sederhana yaitu:
  1. Download RedSn0w.
  2. Sambungkan iPhone dengan PC/Laptop.
  3. Extract dan jalankan RedSn0w yang sudah didownload.
  4. Pada menu RedSn0w klik Extras -> Even More -> Deactivate.
  5. Pastikan iPhone anda sudah deactivated ditandai ada box dengan peringatan Activation Screen.
  6. Buka iTunes, secara otomatis iTunes meminta Apple ID/Passwordnya. Masukan Apple ID/Passwordnya, lalu iTunes akan secara otomatis meng-Activekan iPhone anda.
  7. Reboot  iPhone.
  8. Selamat mencoba semoga berhasil :-).

14 Agustus 2013

Make World FreeBSD

1. Install cvsup binary dan buat file stable-file.
# cd /usr/ports/net/cvsup-without-gui (Asumsi anda tidak running X system)
# make ; make install ; make clean
# cd /root/
# mkdir cvsup
# cd cvsup
# vim stable-file
# cat stable-file
*default host=cvsup3.FreeBSD.org
*default base=/usr
*default prefix=/usr
*default release=cvs tag=RELENG_4
*default delete use-rel-suffix
 src-all
Catatan: Untuk tag=RELENG_4, artinya anda melakukan upgrade last-version untuk FreeBSD 4.X, untuk tag bisa dilihat di http://www.freebsd.org/doc/en_US.ISO8859-1/books/handbook/cvs-tags.html, sedangkan src-all artinya anda melakukan upgrade untuk seluruh source /usr/src. anda bisa customize untuk ini sesuai kebutuhan anda.
# cvsup -g -L 2 stable-file (Tunggu sampe selesai)
2. Prepare untuk file/config yg diperlukan, buat file make.conf:
# vim /etc/make.conf
# cat /etc/make.conf
CFLAGS= -O -pipe
COPTFLAGS= -O -pipe
NOPROFILE=      true
USA_RESIDENT= YES
IPFW2=true
COMPAT22= YES
COMPAT3X= YES
Catatan: Untuk keperluan ini "sangat relatif" silahkan mengacu ke /etc/defaults/make.conf untuk detailnya. Jika mesin yang anda pake standalone atau PC jangkrik tentunya ada baiknya kita masuk ke single user mode, tapi kalo mesin anda sbg server yg musti operational tidak usah masuk single user pun no problem dng konsekwensi makan waktu pengerjaan lebih lama. Skip langkah ini kalo anda tidak mengehendaki masuk single user.
# shutdown now 
# fsck -p
# mount -a -t ufs
# swapon -a
Hapus file object kalo2 sebelomnya anda telah melakukan proses ini.
# cd /usr/
# chflags -R noschg obj/*
# cd obj
# rm -rf *
Catatan: Hilangkan flag schg agar bisa anda hapus, anda bisa view dengan perintah ls -loFa untuk jelasnya.

3 Kita mulai build keseluruhan /usr/src dan meletakan file2 preinstall di /usr/obj secara otomatis biasanya file object.
# cd /usr/src
# make buildworld
# make buildkernel KERNCONF=NAMA_KERNEL_ANDA_SEKARANG
# make installkernel KERNCONF=NAMA_KERNEL_ANDA_SEKARANG
# make installworld
# make delete-old (Optional)
# make delete-old-libs (Optional)
Jika anda gagal dan berniat untuk mengulanginya anda bisa lakukan.
# chflags -R noschg /usr/obj/*
# cd /usr/obj
# rm -rf *
# cd /usr/src
# make cleandir (2X)
# cvsup -g -L 2 stable-file (Ulang sekali lagi)
4. Update semua file configurasi system /etc, /dev /stand.
# cd /
# cp -Rp /etc /etc.old
# mkdir /var/tmp/root (Untuk FreeBSD 4.X only)
# cd /usr/src/etc (Untuk FreeBSD 4.X only)
# make DESTDIR=/var/tmp/root distrib-dirs distribution (Untuk FreeBSD 4.X only)
Catatan: Kita buat direktori sementara untuk menyimpan file2 yang baru, kita tempatkan di /var/tmp/root.
Update /dev.
# cp /var/tmp/root/dev/MAKEDEV /dev (Untuk FreeBSD 4.X only)
# cd /dev ; sh MAKEDEV all (Untuk FreeBSD 4.X only)
Update stand.
# cd /usr/src/release/sysinstall ; make all install (Untuk FreeBSD 4.X only)
5. Update file² yg diperlukan.
# mergemaster -s
Catatan: Anda akan dihadapkan beberapa options dan perbandingan 'file yang lama' dan 'file yang baru', untuk [merge] anda pijit 'm', di layar anda ada 2 bagian yaitu bagian kiri dan bagian kanan, dimana bagian kiri adalah file config lama, bagian kanan file config baru, anda tinggal pilih 'l' (left) untuk file lama (bisa berkali-kali), pijit 'r' untuk file baru (bisa berkali-kali), jika ada option tampil anda pilih 'i' untuk install, proses ini terus menerus sampe semua file dibandingkan sistem. *HATI HATI UNTUK PROSES INI* Semua file baru disalin di direktori "/var/tmp/temproot/" ketika "mergemaster -s". Jika kelak diperlukan bisa ngebrowse kembali ke direktori ini.

6. Reboot.

08 Juli 2013

ipfw_WF2Q+

1. Jika anda ingin menimplementasikan WF2Q+ dengan ipfw di mesin dengan tujuan:
- Sharing bandwidth antar client misalnya untuk ratio 1:4.
- Sharing bandwidth evenly/rata diantara client tersebut (Tapi bukan garansi/CIR).
- Adanya bandwidth peak/burst diantara client jika client yg lain idle.
2. Untuk sharing bandwidth dengan ratio 1:4 bisa anda kelompokan client anda dalam satu group misalnya:
- Host A, B, C, D diberi bandwidth rebutan/sharing sebesar 128 Kbit/s, dengan IP Address:
* Host A : 192.168.0.1/32
* Host B : 192.168.0.2/32
* Host C : 192.168.0.3/32
* Host D : 192.168.0.4/32
Asumsi subnet yg anda pilih /24 atau 255.255.255.0, jika anda ingin menggunakan subnetting juga itu lebih bagus.

3. Bikin rule di /etc/rc.firewall dan letakan sebelom rule permit/deny:
ipcl_grup01="192.168.0.0/24{1,2,3,4}"
bw_share01="128Kbit/s"
bw_down_share01="128Kbit/s"
bw_up_share01="64Kbit/s"
ifint="inside_interface"

# Sample format 1 - Limiting downstream saja.
${fwcmd} add 1 queue 1 ip from any to ${ipcl_group01} out via ${ifint} // Downstream
${fwcmd} queue 1 config weight 50 queue 4 pipe 1 mask dst-ip 0xffffffff
${fwcmd} pipe 1 config queue 4 bw ${bw_down_share01}

# Sampel format 2 - Limiting upstream saja.
${fwcmd} add 1 queue 1 ip from ${ipcl_group01} to any in  via ${ifint} // Upstream
${fwcmd} queue 1 config weight 50 queue 4 pipe 1 mask src-ip 0xffffffff
${fwcmd} pipe 1 config queue 4 bw ${bw_up_share01}

# Sample format 3 - Limiting downstream/upstream menjadi satu flow.
${fwcmd} add 1 queue 1 ip from any to ${ipcl_group01} out via ${ifint} // Downstream
${fwcmd} add 2 queue 1 ip from ${ipcl_group01} to any in  via ${ifint} // Upstream
${fwcmd} queue 1 config weight 50 queue 4 pipe 1 mask all
${fwcmd} pipe 1 config queue 4 bw ${bw_share01}

# Sample format 4 - Limiting upstream/downstream dengan masing2 flow terpisah.
${fwcmd} add 1 queue 1 ip from any to ${ipcl_group01} out via ${ifint} // Downstream
${fwcmd} add 2 queue 2 ip from ${ipcl_group01} to any in  via ${ifint} // Upstream
${fwcmd} queue 1 config weight 50 queue 4 pipe 1 mask dst-ip 0xffffffff
${fwcmd} queue 2 config weight 50 queue 4 pipe 2 mask src-ip 0xffffffff
${fwcmd} pipe 1 config queue 4 bw ${bw_down_share01}
${fwcmd} pipe 2 config queue 4 bw ${bw_up_share01}
WF2Q+ merupakan varian dari sistem quering policy, dan jangan lupa setelah di assign via queue mesti terhubung ke pipe.
Keterangan:
- queue [Dibagian rule : ${fwcmd} add 1 queue...] : Assign untuk rule WF2Q+.
- weight                                          : Nilei pembanding flow quering (Bukan priority).
                                                    Default 1, allow [1 s/d 100].
- queue [Dibagian rule : ${fwcmd} queue 1 config weight 50 queue...] : Ukuran/jumlah dari "queue/slot" sbg pembanding terhadap jumlah bandwidth. Default 50.
- queue [Dibagian rule : ${fwcmd} pipe 1 config queue...] : Ukuran/jumlah dari "queue/slot" sbg pembanding terhadap jumlah bandwidth. Default 50
- pipe : Assign rule untuk ukuran bandwidth yg terkoneksi.
- mask dst-ip/src-ip : Digunakan untuk masking IP Address/subneting dan port. "dst-ip" digunakan untuk "downstream", "src-ip" digunakan untuk "upstream" dari sample rule diatas (Tergantung dari posisi IP client/port). 0xffffffff adalah value subnet, sama dengan "0.0.0.0/0" (Match all IP Address). Untuk port default "0x0000" artinya tidak menspesifikan/pembatasan port.
4. Perhitungan:
bw_perclient = (w_client / w_jumlah_) * bw_total
Sample diatas perclient mempunyai weight masing2 50, total bw 128 Kbit/s. Katakanlah untuk host A bisa dikalkulasikan sbb:
bw_host_A = (50 / (50*4)) * 128 Kbit/s
          = (50 / 200) * 128 Kbit/s
          = 32 Kbit/s
Jika semua host aktif maka dummynet akan berusaha membagi rata sejumlah 32 Kbit/s per hostnya. Nah contoh diatas mempunyai weight yg sama besarnya, gimana kalo contohnya begini:
w_host_A = 30
w_host_B = 50
w_host_C = 50
w_host_D = 50
Maka bisa kita kalkulasikan bw yg didapat oleh host A dan host B sbb:
bw_host_A = (30 / (30+50+50+50)) * 128 Kbit/s
          = (30 / 180) * 128 Kbit/s
          = 21.333 Kbit/s

bw_host_B = (50 / (30+50+50+50)) * 128 Kbit/s
          = (50 / 180) * 128 Kbit/s
          = 35.55 Kbit/s
Contoh lain:
w_host_A = 10
w_host_B = 20
w_host_C = 30
w_host_D = 40

bw_host_A = (10 / (10+20+30+40)) * 128 Kbit/s
          = (10 / 100) * 128 Kbit/s
          = 12.8 Kbit/s

bw_host_B = (20 / (10+20+30+40)) * 128 Kbit/s
          = (20 / 100) * 128 Kbit/s
          = 25.6 Kbit/s
Perhitungan queue slot. Dalam hal ini queue di rule diatas adalah 4, maka bisa dikalkulasikan:
bw_perclient = bw_total/slot_queue
Dari sample diatas bisa dihitung untuk host A sbb:
bw_host_A = 128 Kbit/s / 4 
          = 32 Kbit/s
Jika semua host aktif maka dummynet akan berusaha membagi rata bandwidth 32 Kbit/s per slot-nya (1 slot = 32 Kbit/s). IMHO, queue slot mendingan disesuaikan dengan jumlah client yg share, contoh diatas 1:4 berarti queue slot-nya

4. Jika kita rubah misalnya queue slot menjadi 8 slot maka ada kemungkinan host A akan menggunakan lebih dari 1 slot, artinya bisa cenderung ngerebut slot jatah host lain.
root:~# uname -srnm
FreeBSD gw-core-introuter.kumprang.com 4.10-STABLE i386
root:~# ipfw queue show
00001:  24.000 Kbit/s    0 ms   50 sl. 1 queues (1 buckets) droptail
   mask: 0x00 0x00000000/0x0000 -> 0x00000000/0x0000
BKT Prot ___Source IP/port____ ____Dest. IP/port____ Tot_pkt/bytes Pkt/Byte Drp
  0 tcp      74.6.68.227/42040   202.146.228.9/80    5535  3192733  0   0   0
00002:  68.000 Kbit/s    0 ms    6 sl. 0 queues (1 buckets) droptail
   mask: 0x00 0x00000000/0x0000 -> 0x00000000/0x0000
00003:  36.000 Kbit/s    0 ms    6 sl. 0 queues (1 buckets) droptail
   mask: 0x00 0x00000000/0x0000 -> 0x00000000/0x0000
q00001: weight 50 pipe 2    6 sl. 6 queues (64 buckets) droptail
   mask: 0x00 0x00000000/0x0000 -> 0xffffffff/0x0000
BKT Prot ___Source IP/port____ ____Dest. IP/port____ Tot_pkt/bytes Pkt/Byte Drp
 17 ip           0.0.0.0/0         192.168.1.1/0     81105 53885327  0   0  2960
 26 ip           0.0.0.0/0        192.168.1.10/0     121939 96279102  0  0  3719
 27 ip           0.0.0.0/0        192.168.1.11/0     134476 96276870  0  0  6141
 28 ip           0.0.0.0/0        192.168.1.12/0     35325 17986730  0   0  1243
 29 ip           0.0.0.0/0        192.168.1.13/0     43479 35034555  0   0  1247
 34 ip           0.0.0.0/0        192.168.1.50/0     154963 152289033  0  0 8521
q00002: weight 50 pipe 3    6 sl. 6 queues (64 buckets) droptail
   mask: 0x00 0xffffffff/0x0000 -> 0x00000000/0x0000
BKT Prot ___Source IP/port____ ____Dest. IP/port____ Tot_pkt/bytes Pkt/Byte Drp
 12 ip      192.168.1.50/0             0.0.0.0/0     128724 17526438  0  0  211
 42 ip       192.168.1.1/0             0.0.0.0/0     71625  8097141  0   0  592
 48 ip      192.168.1.12/0             0.0.0.0/0     28546  2747603  0   0  131
 50 ip      192.168.1.13/0             0.0.0.0/0     32582  3594117  0   0  29
 60 ip      192.168.1.10/0             0.0.0.0/0     102737 10325047  0  0  73
 62 ip      192.168.1.11/0             0.0.0.0/0     89624  8851578  0   0  100
Kolom paling kanan pertanda paket yg sudah didrop, uji gampangnya lihat saja jika kita download gede2an (pake getright/flashget) pasti banyak yg didrop sesuai dengan perhitungan diatas. Dan silahkan coba download dengan cara dilimit di client (pake getright/flashget misalnya) sesuei dengan perhitungan diatas, nah gimana hasilnya tuh :-).

Sistem kerjanya, andaikata host A menggunakan bandwidth melebihi kapasitas sharing bandwidth bedasarkan perhitungan diatas dan host B pada saat bersamaan mulai ngeload bandwidth (katakanlah mulai ngeclick browser) maka host A akan didrop secara random untuk memberikan kesempatan kepada host B sampai kedudukannya seimbang (katakanlah jika bandwidth 128 Kbit/s maka host A akan mendapatkan 64 Kbit/s dan host B akan mendapatkan 64 Kbit/s), dan ketika host B tidak ngeload bandwidth (idle) maka host A akan mendapatkan bandwidth 128 Kbit/s kembali.

04 Juni 2013

Merubah Tipe File Windows Ke UNIX

1. Caranya beginoh:
# perl -i.bak -npe 's/\r\n/\n/g' file ...
2. Atau bisa kita pake:
# tr -d '\r' < dos-text-file > unix-file
3. Atau bisa juga:
# col -b < dos-text-file > unix-text-file

26 Mei 2013

Console UNIX Berwarna

1. Silahkan porting:
# cd /usr/ports/misc/gnuls/
# make ; make install
2. Bikin alias di ~/, kalo root pake .bashrc, sedangkan user pake .bash_profile.
# cat .bashrc
alias ls='gnuls --color=auto -a'
$ cat .bash_profile
alias ls='gnuls --color=auto -a'

28 April 2013

Windows XP Restart

Lumayan dikerjain dengan komputer billing di warnet saya karena selalu restart persatuan waktu yg tidak bisa ditentukan. Awalnya saya curiga hardware (Memori/Prosesor kepanasan/Power Supply yg udah jelek). Saya coba untuk membawa komputer saya ke reparasi hardware untuk mengeceknya tapi ternyata komputer tidak apa-apa. Ganti-ganti memori, benerin heatsing karena takut kepanasan, sampe ganti kabel power takut udah jelek, plus ganti kabel SATA Hardisk. Tapi ternyata bukan!

Dengan melihat perbedaan di tempat saya dengan di tempat reparasi hardware adalah "Di tempat saya dicolok kabel LAN, sedangkan di reparasi hardware tidak dicolok kabel LAN". Logika perbedaan yang simple tapi menjadi awal clue pemecahannya. Saya coba di tempat saya tidak dicolok kabel LAN dan ternyata komputer tidak restart lagi!. OK, permasalahan ternyata di seputar LAN device, cable, atau switch LAN?. Saya mulai mencari solusi untuk masalah ini:
  1. Ganti ethernet dengan external ethernet (Asalnya ethernet onboard).
  2. Ganti kabel UTP
  3. Ganti port colokan di switch dan merestart switch.
  4. Update driver LAN onboard
Ternyata semua ke-4 solusi itu tidak mengatasi setiap kali kabel UTP di colokin komputer selalu restart. OK, saya mulai lebih detail lagi dengan melihat log via "Event Viewer", dan bengo! ternyata ada beberapa log error yang cukup serius:
Error code 00000027, parameter1 baad00a3, parameter2 a7a6b3b8, parameter3 a7a6b0b4, parameter4 00040001.
Saya mulai mencari informasi dari Google, dan ada beberapa solusi yang bisa ditawarkan:
  1. Menambah memori fisik.
  2. Menambah paging file via virtual memory.
Tapi ternyata error itu masih nampak :-(, akhirnya saya coba untuk reinstall Windows dan akhirnya error itu tidak nampak, asumsi saya karena sistem udah rusak duluan jadi mau gak mau harus reinstall Windowsnya.

Besoknya saya install IDM (Internet Download Manager) untuk mendownload video, loh errornya kembali muncul komputer sering restart lagi. Saya cek kembali log Event Viewer ternyata ketemu lagi masalah yang sama. OK berarti semuanya ini gara-gara IDM sialan!.

System damage/error karena tidak bisa mengakses (read) memory address setelah menginstall IDM (Internet Download Manager) inilah penyebab utamanya!.


Untuk solusinya mudah sekali, tinggal uninstall saja IDM keparatnya :). Permasalahnya karena saya kurang sistematis mengerjakannya, tidak diurut dari kemungkinan yang terdekat dan pengerjaannya yang paling mudah dulu. Mudah-mudahan sharing ini membantu pembaca.